

728x90
36일차
30개 프로젝트로 배우는 Android 앱 개발 with Kotlin 초격차 패키지 Online
강의 목표
- 프로젝트를 따라해보며 앱개발에 필요한 기술을 학습할 수 있습니다.
- 프로젝트를 따라해보며 앱개발에 필요한 기술을 학습할 수 있습니다.
- 앱 개발시 원하는 기능을 구현하기 위해 어떤 기술이 필요한 지 알 수 있습니다.
- 디자인 아키텍처 패턴, 비동기 처리 등 효율적인 앱 개발 방법을 익힐 수 있습니다.
목차 02 Basic - Ch06. 뽀모도로 타이머
- 인트로
- 기본 UI 구성하기
- 타이머 기능 구현하기
- 효과음 추가하기
- 완성도 높이기
인트로
이번 챕터에서는 뽀모도로 타이머를 만들어보는 프로젝트를 진행해볼것이다.
- 슬라이더를 움직여서 시간을 조정 (1~60)
- 놓는 순간 타이머 시작
- 1초마다 화면 갱신 (효과음)
- 종료시 타이머 효과음
기본 UI 구성하기
Layout
<?xml version="1.0" encoding="utf-8"?>
<androidx.constraintlayout.widget.ConstraintLayout xmlns:android="http://schemas.android.com/apk/res/android"
xmlns:app="http://schemas.android.com/apk/res-auto"
xmlns:tools="http://schemas.android.com/tools"
android:layout_width="match_parent"
android:layout_height="match_parent"
tools:context=".MainActivity">
<TextView
android:id="@+id/remainMinutesTextView"
android:layout_width="wrap_content"
android:layout_height="wrap_content"
android:text="00"
android:textSize="40sp"
app:layout_constraintBottom_toBottomOf="parent"
app:layout_constraintHorizontal_chainStyle="packed"
app:layout_constraintLeft_toLeftOf="parent"
app:layout_constraintRight_toLeftOf="@id/remainSecondsTextView"
app:layout_constraintTop_toTopOf="parent"
tools:ignore="HardcodedText" />
<TextView
android:id="@+id/remainSecondsTextView"
android:layout_width="wrap_content"
android:layout_height="wrap_content"
android:text="00"
android:textSize="40sp"
app:layout_constraintBottom_toBottomOf="@id/remainMinutesTextView"
app:layout_constraintLeft_toRightOf="@id/remainMinutesTextView"
app:layout_constraintRight_toRightOf="parent"
app:layout_constraintTop_toTopOf="@id/remainMinutesTextView"
tools:ignore="HardcodedText" />
<SeekBar
android:id="@+id/seekBar"
android:layout_width="0dp"
android:layout_height="0dp"
android:layout_marginLeft="10dp"
android:layout_marginRight="10dp"
android:max="60"
android:min="0"
app:layout_constraintBottom_toBottomOf="parent"
app:layout_constraintLeft_toLeftOf="parent"
app:layout_constraintRight_toRightOf="parent"
app:layout_constraintTop_toBottomOf="@id/remainSecondsTextView" />
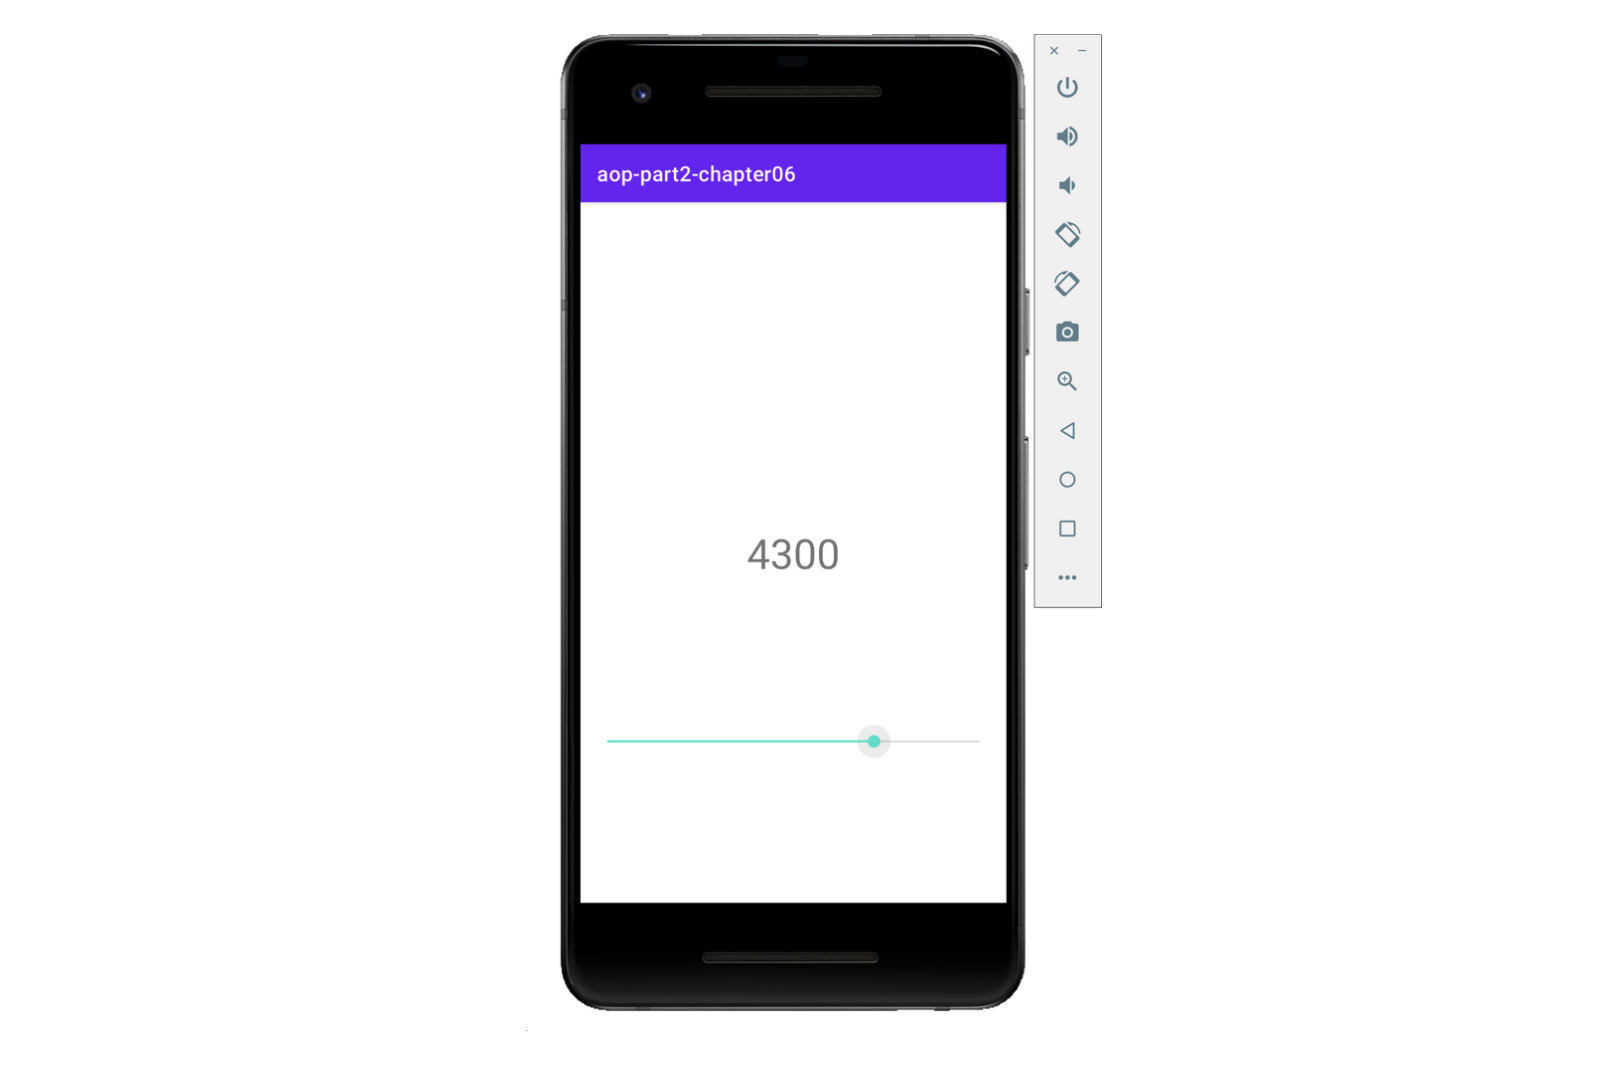
</androidx.constraintlayout.widget.ConstraintLayout>분과 초를 표시하기 위한 TextView 두개를 설정하였다.
두 수를 모두 중앙으로 모으기 위해 분 기준으로 chain- Packed
밑에는 SeekBar로 슬라이더를 추가할 수 있다.
Constraint 레이아웃을 적절히 활용하여 배치하고 min max값을 0~60으로 주었다.
이 슬라이더를 조작하여 타이머의 분을 조절할 수 있도록 할 것이다.
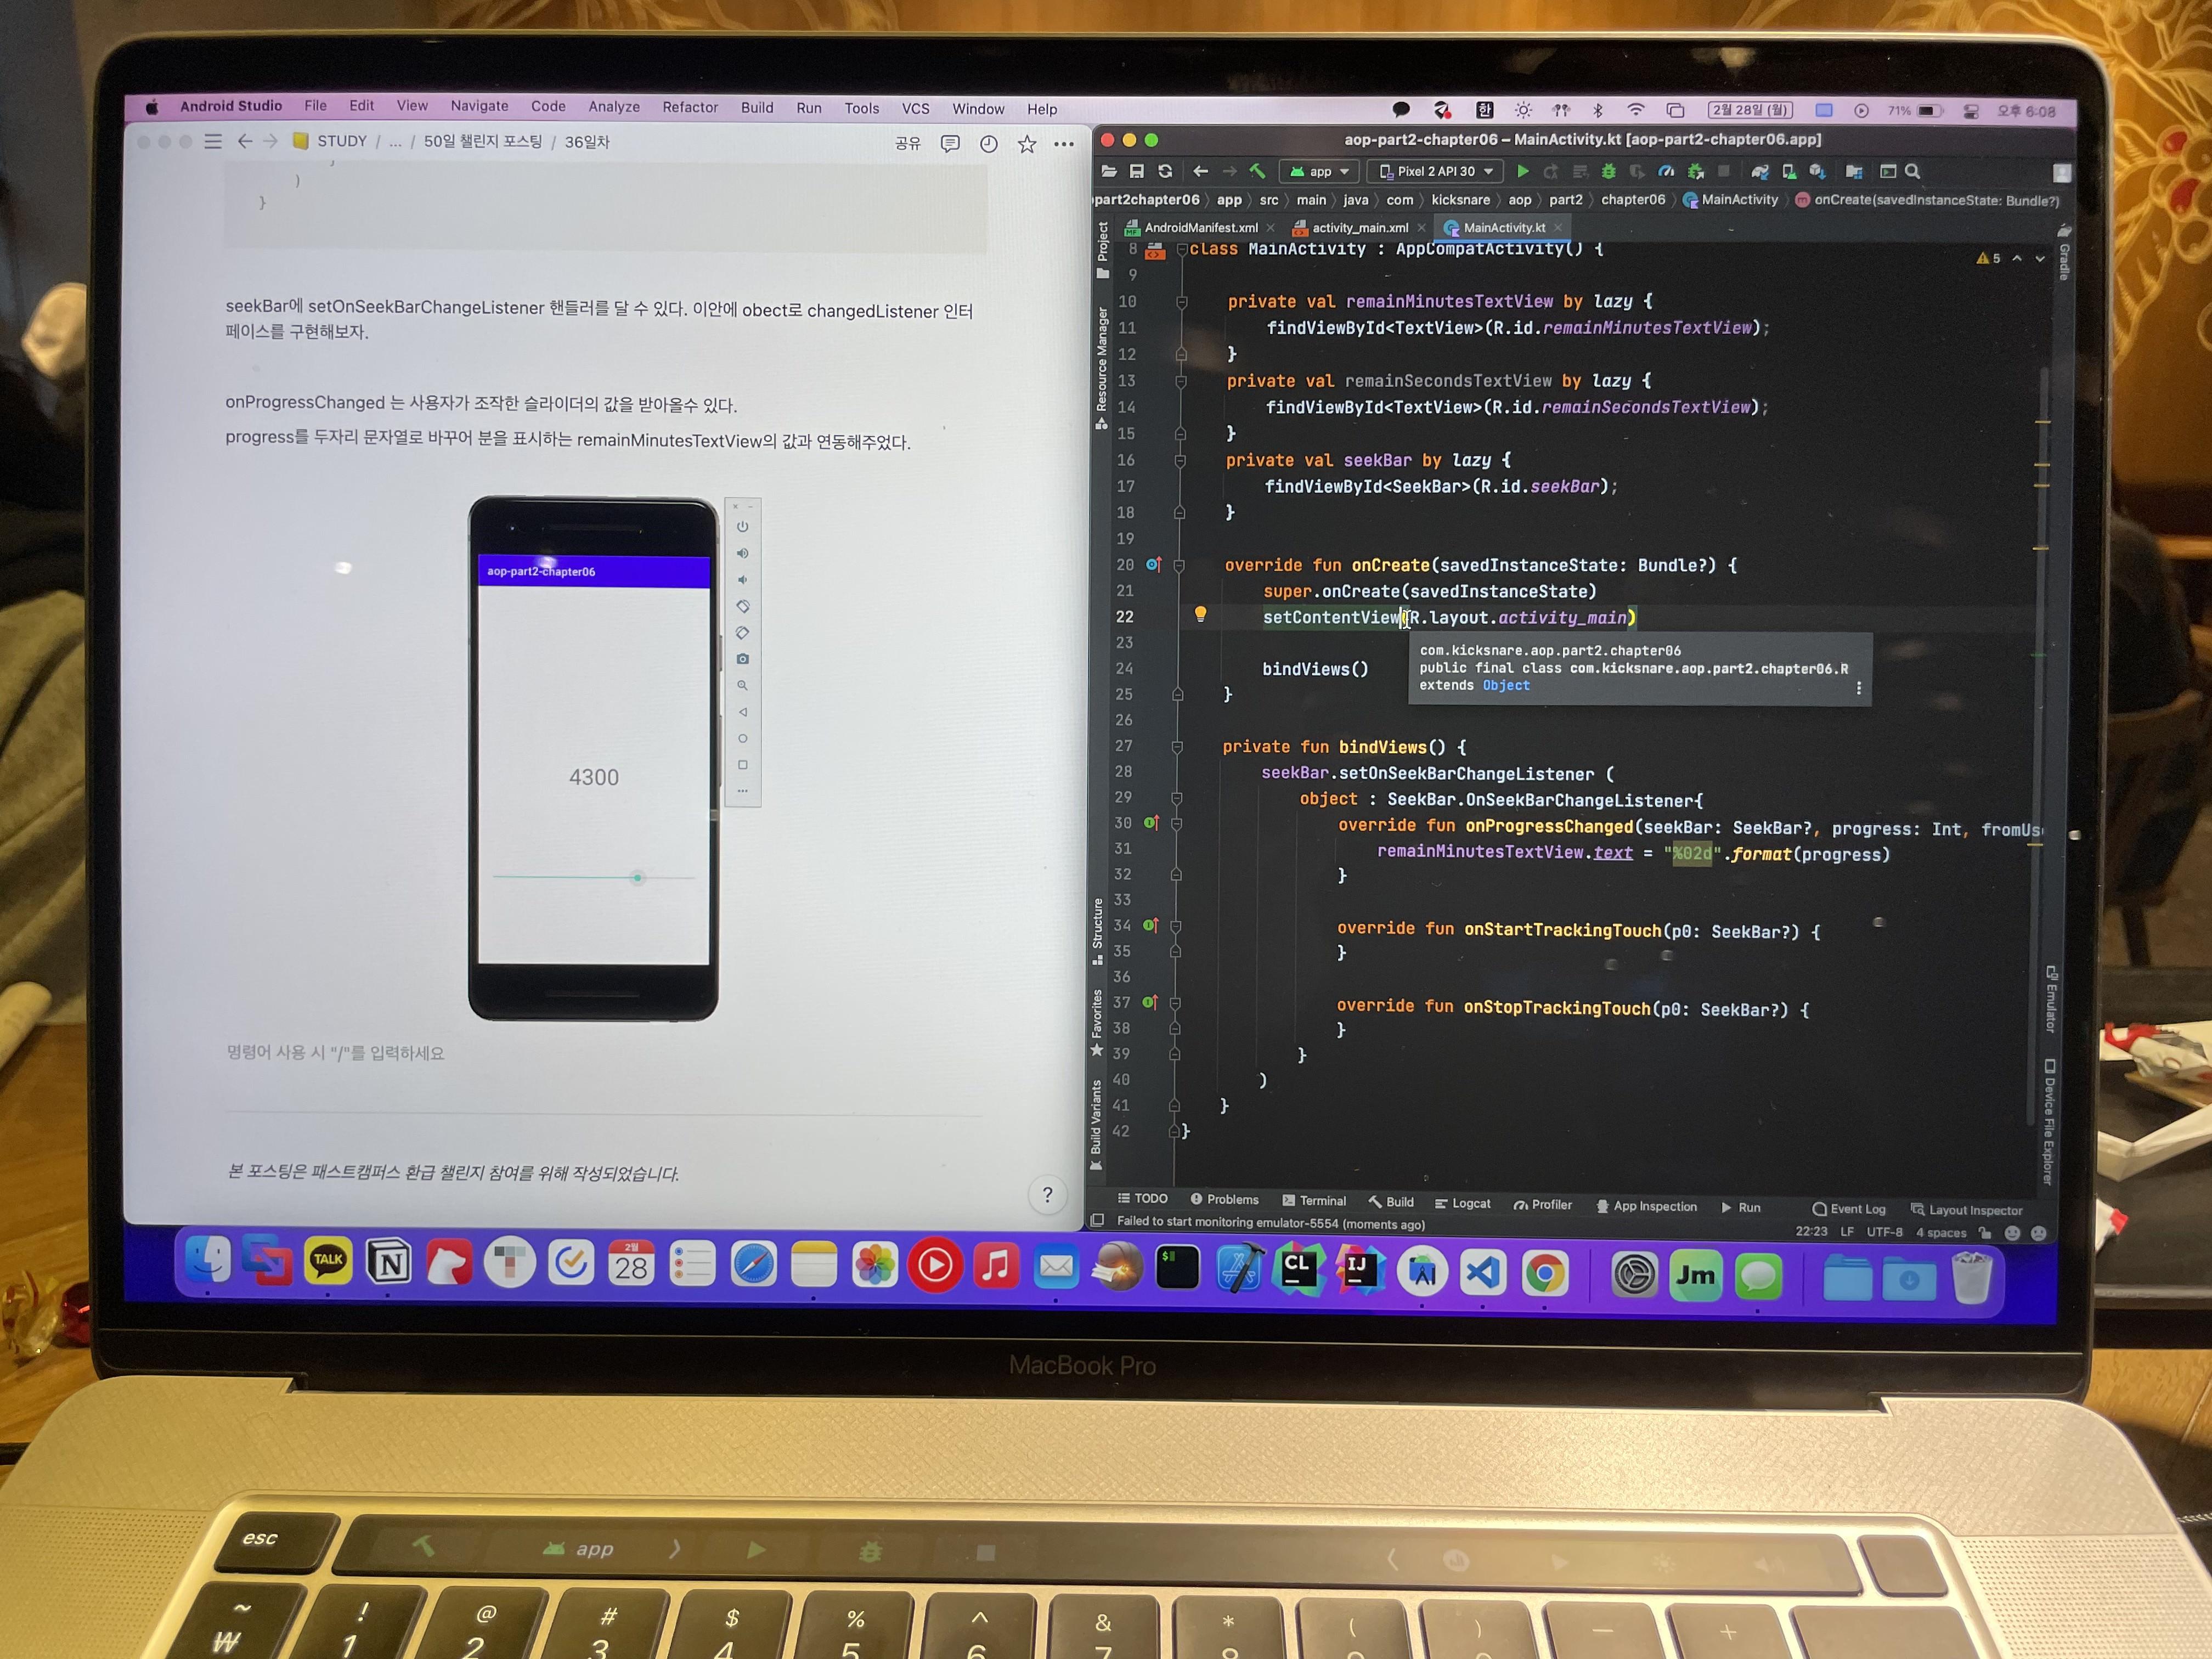
메인 액티비티에서 뷰바인딩을 먼저 해주자
private val remainMinutesTextView by lazy {
    findViewById<TextView>(R.id.remainMinutesTextView);
}
private val remainSecondsTextView by lazy {
    findViewById<TextView>(R.id.remainSecondsTextView);
}
private val seekBar by lazy {
    findViewById<SeekBar>(R.id.seekBar);
}
그리고 seekBar의 슬라이더 값을 연동해줘야 한다.
private fun bindViews() {
    seekBar.setOnSeekBarChangeListener (
        object : SeekBar.OnSeekBarChangeListener{
            override fun onProgressChanged(seekBar: SeekBar?, progress: Int, fromUser: Boolean) {
                remainMinutesTextView.text = "%02d".format(progress)
            }

            override fun onStartTrackingTouch(p0: SeekBar?) {
            }

            override fun onStopTrackingTouch(p0: SeekBar?) {
            }
        }
    )
}
seekBar에 setOnSeekBarChangeListener 핸들러를 달 수 있다. 이안에 obect로 changedListener 인터페이스를 구현해보자.
onProgressChanged 는 사용자가 조작한 슬라이더의 값을 받아올수 있다.
progress를 두자리 문자열로 바꾸어 분을 표시하는 remainMinutesTextView의 값과 연동해주었다.
본 포스팅은 패스트캠퍼스 환급 챌린지 참여를 위해 작성되었습니다.
수강인증샷
링크
728x90
'Android > Challenge' 카테고리의 다른 글
| 패스트캠퍼스 챌린지 38일차 (0) | 2022.03.02 |
|---|---|
| 패스트캠퍼스 챌린지 37일차 (0) | 2022.03.01 |
| 패스트캠퍼스 챌린지 35일차 (0) | 2022.02.27 |
| 패스트캠퍼스 챌린지 34일차 (0) | 2022.02.26 |
| 패스트캠퍼스 챌린지 33일차 (0) | 2022.02.25 |